Things that are harder than they should be: creating and monitoring a group chat in Teams

There’s a great Robin Williams bit on golf that I always come back to when I think of things that seem to be deliberately made harder than they should be (since this is the internet, it is, of course, on youtube, but might be NSFW).  This resonated with me this week when I was trying to finally solve what should be a simple problem: how can I have a Teams application:

  • Create a group chat with a subject name
  • Add/remove participants from that chat
  • Send messages to the chat
  • Read all messages in the chat
  • Do all of this with application permissions

Back in the days of Lync server, an application could create a chat pretty easily, and get notified of all the messages, so we kind of took things for granted.  Teams, however, seems to go out of its way to make this as difficult as possible…

Now you may be asking why I’d want to do this in the first place, which is a valid question I suppose.  The answer is that the limitation of a bot only having a single conversation with an end user is a problem, because everything gets mashed into the same chat thread with no context.  By using named group chats, you can do cool stuff like:

  • Have an agent on multiple support chats at the same time with application monitoring
  • Build a chat relay app between Teams and another communications platform (like Azure Communication Services)
  • Have a bot in a group chat monitor messages for suggested action items as they happen, without having to be @mentioned.
  • and so on…

So let’s dive in!

1-Creating the chat

Ok, so first off, you have an application, and a GraphServiceClient, and you want to create a chat.  Great-there’s a chat.create permission, but you need user permissions for that.  Apps, apparently, can’t be trusted to create chats.  They can get delegated chat.create by an admin, you can actually set a policy to create a meeting as the user now, and that same application can be granted Mail.ReadWrite.All just fine, but creating a chat thread is apparently a bridge too far.  Fine-you can get an oauth token as the user easily enough.  Once you have it, you can use a GraphServiceClient to create the chat like this:

Chat c = new Chat
 {
     ChatType = ChatType.Group,
     Topic = "Group chat:" + Guid.NewGuid(),
     Members = new ChatMembersCollectionPage()
     {
         new AadUserConversationMember
         {
             Roles = new List<String>()
             {
                 "owner"
             },
             AdditionalData = new Dictionary<string, object>()
             {
                 {"user@odata.bind", "https://graph.microsoft.com/v1.0/users/"+ userID}
             }
         },
         new AadUserConversationMember
         {
             Roles = new List<String>()
             {
                 "owner"
             },
             AdditionalData = new Dictionary<string, object>()
             {
                 {"user@odata.bind", <pre wp-pre-tag-0=""></pre>quot;https://graph.microsoft.com/v1.0/users/" + AppId}
             }
         }
     }
 };

//requires TeamsAppInstallation.ReadWriteForChat
 Chat resp = await m_graphClientUser.Chats.Request().AddAsync(c);
 m_chatID = resp.Id;
var teamsAppInstallation = new TeamsAppInstallation
 {
     AdditionalData = new Dictionary<string, object>()
 {
     {"teamsApp@odata.bind", "https://graph.microsoft.com/v1.0/appCatalogs/teamsApps/" + catalogAppID}
 }
 };
 await m_graphClientUser.Chats[resp.Id].InstalledApps.Request().AddAsync(teamsAppInstallation);

This also adds the application to the chat using the catalogAppID.  This is not, as you might expect, the AAD appID, but instead the identity of the app in the app catalog, which you can find using another graph call.

2-Add/remove participants from the chat

This part of the process actually worked almost exactly as expected.  Now that the app is part of the chat, something like this:

var conversationMember = new AadUserConversationMember
{
    VisibleHistoryStartDateTime = DateTimeOffset.Parse("0001-01-01T00:00:00Z"),
    Roles = new List<String>()
    {
        "owner"
    },
    AdditionalData = new Dictionary<string, object>()
    {
        {"user@odata.bind", "https://graph.microsoft.com/v1.0/users/" + targetID}
    }
};

await m_graphClientApp.Chats[m_chatID].Members.Request().AddAsync(conversationMember);

does what you’d think and adds a user to the chat.  You can remove chat members the same way, and that includes federated AAD identities as well.  Of course, you have to have the user GUID for that, but one problem at a time.

3-Send messages to the chat

For those keeping score at home, I’ve created a Microsoft.Graph.GraphServiceClient with user permissions, and a GraphServiceClient with app permissions, but in order to send messages to the chat, I’ve found that it’s easiest to create yet ANOTHER endpoint using Microsoft.Bot.Connector.ConnectorClient.  I mean, you’d think this would work:

var chatMessage = new ChatMessage
{
    Body = new ItemBody
    {
        Content = "message from app"
    }
};

//await m_graphClientUser.Chats[m_chatID].Messages.Request().AddAsync(chatMessage);
await m_graphClientApp.Chats[m_chatID].Messages.Request().AddAsync(chatMessage);

But no.  Fails with BOTH app and user credentials.  What does work is:

IMessageActivity msg = Activity.CreateMessageActivity();
msg.Text = "message from bot";
await m_botConnectorClient.Conversations.SendToConversationAsync(m_chatID, (Activity)msg);

The nice part about this is that you can send all sorts of fun things with the message like Adaptive Card attachments that have universal actions on them.

4-Read the chat messages


At this point, you would assume that your app, as a full fledged member of a group chat thread, would get notified (OnTurnAsync) of new messages in the chat.  Nope-you’ll get some events this way (Participant add/remove), but even with a Chat.Read permission, you’ll need yet another endpoint to get the chat data.  In this case, it’s a change notification subscription that you’ll need to renew every 60 minutes. Before that though, you’ll need this in your manifest:
 

“webApplicationInfo”: {
“id”: “APPID”,
“resource”: “anythingCanGoHere”,
“applicationPermissions”: [
“ChatSettings.ReadWrite.Chat”,


It’s easy enough to subscribe as an app:


Subscription sub = new Subscription()
{
    NotificationUrl = "https://notificationDomain/changenotification/change",
    LifecycleNotificationUrl = "https://notificationDomain/changenotification/lifecycle",
    Resource = "/chats/" + m_chatID + "/messages",
    ExpirationDateTime = DateTime.Now.AddMinutes(60),
    ClientState = "GraphTester_" + m_chatID,
    EncryptionCertificate = certString,
    EncryptionCertificateId = "rndwildcard",
    IncludeResourceData = true,
    ChangeType = "created,updated",
};

Subscription s = await m_graphClientApp.Subscriptions.Request().AddAsync(sub);


I just handled this with a new controller that took a POST.  Seems simple enough, right?  I’ll get some json with the event data in it?  Nope, the data is encrypted, and the SDK doesn’t handle decryption.  This is the code I pulled together from a couple of different docs pages:
[HttpPost]
[Route("change")]
public async Task<IActionResult> ChangeNotification([FromQuery] string validationToken = null)
{
    try
    {
        // handle validation
        if (!string.IsNullOrEmpty(validationToken))
        {
            _log.Info(<pre wp-pre-tag-6=""></pre>quot;Received Token: '{validationToken}'");
            return Ok(validationToken);
        }

        using (StreamReader reader = new StreamReader(Request.Body))
        {
            string body = await reader.ReadToEndAsync();
            JObject jsonBody = JObject.Parse(body);
            string dataKey = jsonBody["value"][0]["encryptedContent"]["dataKey"].ToString();
            byte[] encryptedPayload = Convert.FromBase64String(jsonBody["value"][0]["encryptedContent"]["data"].ToString());

            byte[] expectedSignature = Convert.FromBase64String(jsonBody["value"][0]["encryptedContent"]["dataSignature"].ToString());

            if (m_cert == null)
                m_cert = ConfigTools.CertHelper.GetLocalCertificate("SN");  //helper lib I have to pull a cert from the machine store

            RSACryptoServiceProvider privateKeyProvider = (RSACryptoServiceProvider)m_cert.PrivateKey;
            byte[] encryptedSymmetricKey = Convert.FromBase64String(dataKey);

            // Decrypt using OAEP padding.
            byte[] decryptedSymmetricKey = privateKeyProvider.Decrypt(encryptedSymmetricKey, fOAEP: true);
            byte[] actualSignature;

            using (HMACSHA256 hmac = new HMACSHA256(decryptedSymmetricKey))
            {
                actualSignature = hmac.ComputeHash(encryptedPayload);
            }
            if (actualSignature.SequenceEqual(expectedSignature))
            {
                AesCryptoServiceProvider aesProvider = new AesCryptoServiceProvider();
                aesProvider.Key = decryptedSymmetricKey;
                aesProvider.Padding = PaddingMode.PKCS7;
                aesProvider.Mode = CipherMode.CBC;

                // Obtain the intialization vector from the symmetric key itself.
                int vectorSize = 16;
                byte[] iv = new byte[vectorSize];
                Array.Copy(decryptedSymmetricKey, iv, vectorSize);
                aesProvider.IV = iv;

                string decryptedResourceData;
                // Decrypt the resource data content.
                using (var decryptor = aesProvider.CreateDecryptor())
                {
                    using (MemoryStream msDecrypt = new MemoryStream(encryptedPayload))
                    {
                        using (CryptoStream csDecrypt = new CryptoStream(msDecrypt, decryptor, CryptoStreamMode.Read))
                        {
                            using (StreamReader srDecrypt = new StreamReader(csDecrypt))
                            {
                                decryptedResourceData = srDecrypt.ReadToEnd();
                                _log.Info("Got decrypted resource: " + decryptedResourceData);
                                JObject message = JObject.Parse(decryptedResourceData);

                                string fromID = string.Empty;
                                bool isBotMessage = false;
                                string fromDisplayName = string.Empty;
                                if (!String.IsNullOrEmpty(message["from"]["application"].ToString()))
                                {
                                    fromID = message["from"]["application"]["id"].ToString();
                                    fromDisplayName = message["from"]["application"]["displayName"].ToString();
                                    isBotMessage = true;
                                }
                                else
                                {
                                    fromID = message["from"]["user"]["id"].ToString();
                                    fromDisplayName = message["from"]["user"]["displayName"].ToString();
                                }

                                string msgText = message["body"]["content"].ToString();
                                string msgType = message["body"]["contentType"].ToString();
                                _log.Info(<pre wp-pre-tag-6=""></pre>quot;Chat thread message: {msgText} type: {msgType} from: {fromDisplayName} {fromID}  is bot {isBotMessage}");
                            }
                        }
                    }
                }
            }
            else
            {
                _log.Error("Malformed event detected.");
            }
        }
        return Ok();
    }
    catch (Exception ex)
    {
        return StatusCode((int)HttpStatusCode.InternalServerError);
    }
}
 

Not rocket surgery, but also still way harder than it should be to get the contents of a chat message from a conversation the bot is already part of. 


Finally, we have an application that can do everything I expected an app in a chat should be able to do out of the box, it just took a few extra boxes.  I’m sure that some of this will get easier in the future, and I should point out that none of this is production code (very much a prototype/demo), and a bunch of things are in the beta branch.  Still, four different endpoints to manage a group chat?  I suppose it’s better than 18…
Posted in Uncategorized | 1 Comment

How to enable a mobile hotspot in Windows 10 when you also have Hyper-V installed

This is probably a really niche issue, but I couldn’t find a clean answer for it on Google.  This is also the second time I’ve run into this issue (after a laptop format), so if future-me is looking this post up, here’s how to get this working again.

The use case is that I have really crappy wifi in my home office.  Fortunately, I had a box of ethernet cable, a crimper, and enough know-how to wire that room, so I have reliable gigabit in that corner where I seem to pick up all my neighbors’ signals more than my own.  The issue was that I had a couple of devices that I wanted to use in that room that only supported wifi, so I could either put up with slow connections, or set up a mobile hotspot.  I actually forgot that this was a feature until one of the VR applications I was trying to use suggested it (one of the devices I’m trying to connect is my Oculus Quest).

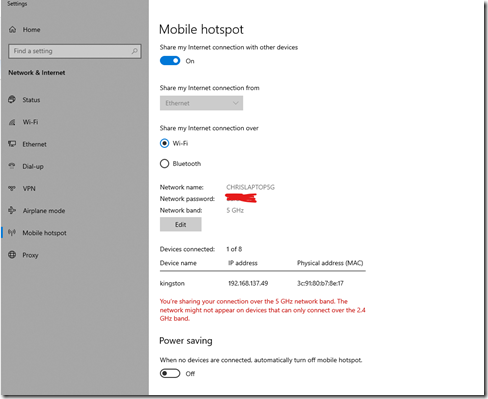
At its most basic level, you just go into settings, turn on Mobile Hotspot, choose your internet connection, and be done with it:

hotspot1

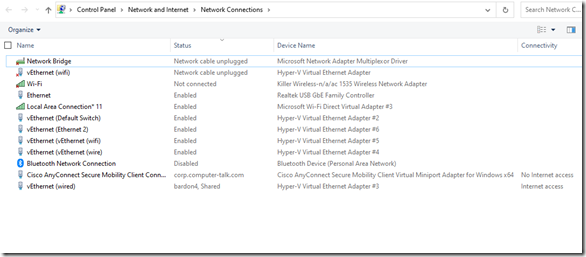
For most “normal” users, this will be fine, but this is where the edge case comes in.  My network connections list looks something like this:

connections

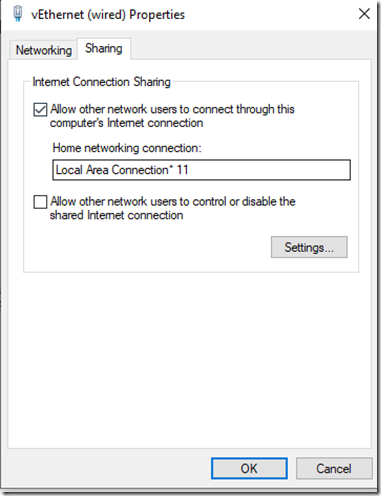
The vEthernet connections are all there because I have Hyper-V installed on my machine, and have a virtual switch that shares my ethernet adapter.  This means that the machine connects through the vEthernet (wired) adapter instead of the physical Ethernet one.  All of this works great, except that the mobile hotspot tries to enable internet connection sharing on the physical adapter, not the virtual one, which means that devices connected through the mobile hotspot have no internet access.  The key, after a bit of trial and error, was to change the properties of the vEthernet adapter like so:

sharing

The wording on this dialog kind of sucks, since “home networking connection” isn’t really what I needed, but it really just means “allow devices on this network to connect through this internet connection”. 

The end result is something that’s not quite as good as a native wired connection, but wifi that is leagues better than what I was getting in my home office before.  This also works really well for things like standalone Teams phones that don’t have Ethernet ports as well as VR headsets.

Posted in Uncategorized | 2 Comments

Adding OAuth authentication to a Teams Bot for Graph access

Authentication sucks.  In a perfect world, we’d be able to write applications that do what they need to do without danger of anyone doing anything malicious.  Just look at SMTP-back when that was written, you just had to send a MAIL FROM request, and you could send an email as just about anyone you wanted, because why would anyone ever impersonate anyone else?  Of course, reality intervened, and we’re now in a world of authentication, secrets, crypto, and granular permissions, that thankfully has been getting easier to deal with.

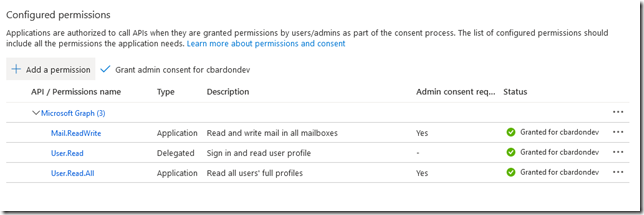
In the bot world, it’s often necessary to access a resource on the graph, and the easiest way to do that is to grant application permissions to the bot.  Here’s an example of something I was trying out in my dev tenant (where I’m a global admin) and can consent to any permissions that I want:

Graph-all permissions

So if my bot has, say, a 1:1 conversation with a user, and wants to notify them of an important message in their inbox, then sure, I can just grant Mail.Read.All and have the bot able to do this for any user in the org.  Unfortunately, if you try to deploy this wonderful bot in the wild, an AD admin is going to look at this permission request and tell you that you’re out of your mind if you think they’re going to give you access to all the mailboxes in the directory just to be able to do this.  This means that scoping these permissions down is in order.

Fortunately, the bot framework has some great capabilities for doing this in the form of an OAuth dialog.  This dialog handles most of the grunt work for an OAuth flow, since it prompts the user to sign in, pops a consent/auth prompt, and returns a token back to your app.  It also handles caching of the tokens in the bot service, meaning that if a user has already consented and signed into the app, then the dialog returns the token without any user intervention.

The docs and sample do a pretty good job of getting you started in most cases, and should be a good starting point for anyone.  The challenge I had with this sample is that my bot wasn’t using Dialogs at all, so the first step was to modify it to be more dialog-centric.  First, I added a dialog class based off the sample app (slightly simplified):

 public class AuthDialog : ComponentDialog
    {
        public AuthDialog()
            : base(nameof(AuthDialog))
        {
            AddDialog(new OAuthPrompt(
                nameof(OAuthPrompt),
                new OAuthPromptSettings
                {
                    ConnectionName = "botTeamsAuth",
                    Text = "Please Sign In",
                    Title = "Sign In",
                    Timeout = 300000, // User has 5 minutes to login (1000 * 60 * 5)
                }));

            AddDialog(new ConfirmPrompt(nameof(ConfirmPrompt)));

            AddDialog(new WaterfallDialog(nameof(WaterfallDialog), new WaterfallStep[]
            {
                PromptStepAsync,
                LoginStepAsync
            }));

            // The initial child Dialog to run.
            InitialDialogId = nameof(WaterfallDialog);
        }

        private async Task<DialogTurnResult> PromptStepAsync(WaterfallStepContext stepContext, CancellationToken cancellationToken)
        {
            return await stepContext.BeginDialogAsync(nameof(OAuthPrompt), null, cancellationToken);
        }

        private async Task<DialogTurnResult> LoginStepAsync(WaterfallStepContext stepContext, CancellationToken cancellationToken)
        {
            var tokenResponse = (TokenResponse)stepContext.Result;
            if (tokenResponse?.Token != null)
            {
                // do something with graph here
                GraphServiceClient client = iceTeamsBotState.GetGraphClient(tokenResponse.Token);
                var messages = await client.Me.MailFolders["inbox"].Messages.Request(new List&lt;Microsoft.Graph.QueryOption&gt; { new Microsoft.Graph.QueryOption("$search", <pre wp-pre-tag-0=""></pre>quot;\"subject:test\"") }).GetAsync();
                await stepContext.Context.SendActivityAsync(<pre wp-pre-tag-0=""></pre>quot;Found {messages.Count} emails");
                return await stepContext.EndDialogAsync(cancellationToken: cancellationToken);
            }
            await stepContext.Context.SendActivityAsync(MessageFactory.Text("Login was not successful please try again."), cancellationToken);
            return await stepContext.EndDialogAsync(cancellationToken: cancellationToken);
        }
    }

Then changed the main bot class header from this:

    public class myBot : IBot

To this:

    public class myBot&lt;T&gt; : TeamsActivityHandler where T:Dialog

Made some changes to ConfigureServices to register the dialog (and change the bot type):

services.AddSingleton&lt;AuthDialog&gt;();

services.AddBot&lt;myBot&lt;AuthDialog&gt;&gt;(options =&gt;
{
	options.CredentialProvider = new SimpleCredentialProvider(botConfig.BotID, botConfig.BotSecret);

	options.OnTurnError = async (context, exception) =&gt;
	{
		_log.Error("Exception caught-OnTurnError: ", exception);
		await context.SendActivityAsync("Sorry, it looks like something went wrong.");
	};
});

And then added a couple of debug commands to test with (yes, there’s repeated code there, but it’s left as-is for clarity):

public override async Task OnTurnAsync(ITurnContext turnContext, CancellationToken cancellationToken = default(CancellationToken))
{
...
	else if (turnContext.Activity.Type == ActivityTypes.Message &amp;&amp; turnContext.Activity.Text == "logout")
	{
		var dialogState = _accessors.ConversationState.CreateProperty&lt;DialogState&gt;(nameof(DialogState));
		var dialogSet = new DialogSet(dialogState);
		dialogSet.Add(new AuthDialog());
		DialogContext dc = await dialogSet.CreateContextAsync(turnContext, cancellationToken);
		var botAdapter = (BotFrameworkAdapter)dc.Context.Adapter;
		await botAdapter.SignOutUserAsync(dc.Context, "botTeamsAuth", null, cancellationToken);
		await turnContext.SendActivityAsync(<pre wp-pre-tag-4=""></pre>quot;logged out of graph");
	}
	else if (turnContext.Activity.Type == ActivityTypes.Message &amp;&amp; turnContext.Activity.Text == "login")
	{
		var dialogState = _accessors.ConversationState.CreateProperty&lt;DialogState&gt;(nameof(DialogState));
		var dialogSet = new DialogSet(dialogState);
		dialogSet.Add(new AuthDialog());
		DialogContext dc = await dialogSet.CreateContextAsync(turnContext, cancellationToken);
		var turnResult = await dc.BeginDialogAsync("AuthDialog");
		await _accessors.ConversationState.SaveChangesAsync(turnContext, false, cancellationToken);
	}
	else if (turnContext.Activity.Type == ActivityTypes.Invoke &amp;&amp; turnContext.Activity.Name == "signin/verifyState")
	{
		var dialogState = _accessors.ConversationState.CreateProperty&lt;DialogState&gt;(nameof(DialogState));
		var dialogSet = new DialogSet(dialogState);
		dialogSet.Add(new AuthDialog());  //this is counterintuitive, but it gets around the issue where I get the dialog missing exception
		DialogContext dc = await dialogSet.CreateContextAsync(turnContext, cancellationToken);
		var turnResult = await dc.ContinueDialogAsync();
		await _accessors.ConversationState.SaveChangesAsync(turnContext, false, cancellationToken);
	}

At this point, the bot can get a token, handle the InvokeResponse, and allow a sign out, which is really useful for testing this.  I actually abstracted some of this into another method similar to this:

public static async Task&lt;string&gt; GetTokenAsync(ITurnContext turnContext, CancellationToken cancellationToken)
{
	var dialogState = _accessors.ConversationState.CreateProperty&lt;DialogState&gt;(nameof(DialogState));
	var dialogSet = new DialogSet(dialogState);
	dialogSet.Add(new AuthDialog());
	DialogContext dc = await dialogSet.CreateContextAsync(turnContext, cancellationToken);
	DialogTurnResult turnResult = null;
	turnResult = await dc.BeginDialogAsync("AuthDialog");
	await _accessors.ConversationState.SaveChangesAsync(turnContext, false, cancellationToken);

	if(turnResult.Status== DialogTurnStatus.Waiting)
	{
		return string.Empty;  //empty string return flags that we're attempting to use a user token.  Allows prompt/retry
	}
	else if(turnResult.Result is TokenResponse)
	{
		string token=((TokenResponse)turnResult.Result).Token;
		return token;
	}
	return null;
}

Which illustrates how the DialogTurnResult comes back for different cases.  If it’s “waiting”, the bot will get an InvokeResponse with the result once the popup is handled, but if the user has already consented, this will return the token immediately, making it easy to call elsewhere in my code.  Of course, this is also only the beginning…

AAD V1 vs AAD V2 and changing permissions

If you followed the docs referenced above for adding auth to a Teams bot, you might have created the registration with AAD V1.  This means that you did not specify any scopes in the registration, and the first time you logged into the app, you needed to consent to the permissions your app registration dictated.  Now, say you publish botv2, and in addition to Mail.Read, you need Mail.Send…  You can update the permission in the app registration, but tokens issued by the OAuthPrompt will not prompt for consent again.  In fact, even signing out (with that “logout” command I added) and back in won’t trigger consent for new permissions.  Instead, the only solution was to go to https://account.activedirectory.windowsazure.com/r#/applications and delete the application, which is something I would not want to walk thousands of end users through doing.

To get around this, create your registration with V2 instead of V1.  The generic bot framework docs have more detail here than the teams-specific ones, but in general, configure your scopes with the list of permissions your bot needs.  If you add to this list, a new sign in will prompt for the new permissions automatically….but you still need to trigger a sign-in to get it.

To work past THIS issue, I added something like this:

private static bool VerifyTokenScopes(string token)
{
	try
	{
		JwtSecurityToken j = new JwtSecurityToken(token);
		var scopes = j.Claims.Where(c =&gt; c.Type == "scp").First();
		if (scopes != null &amp;&amp; scopes.Value != null)
		{
			var presentedScopes = scopes.Value.Split(' ');
			foreach (string scope in config.RequiredOAuthScopes)
			{
				if (!presentedScopes.Contains(scope))
					return false;
			}
		}
	}
	catch(Exception ex)
	{
		_log.Error(<pre wp-pre-tag-6=""></pre>quot;exception validating scopes for token {token}", ex);
	}
	return true;
}

And stored the list of scopes this version of my bot expected in my app config.  I called this when I got a token response, and if a scope was missing, I logged the user out and re-prompted for a sign in.  So far this is the most graceful way I’ve found to deal with changing permissions on a bot, but I’ll update if I discover something better.

Using OAuthTokens in a proactive dialog

Now, say you want to have your bot grab an OAuth token and use it for a proactive dialog that’s triggered from something like a webAPI controller.  Triggering a dialog this way is a little trickier than being reactive, but still possible.  I added something like this to my webAPI code:

public static async Task&lt;string&gt; GetGraphTokenForUser(UInt32 userID)
{
	string conversationID = botState.GetConversationID(userID);
	//m_client is a bot connector client
	var members = await m_client.Conversations.GetConversationMembersAsync(conversationID);

	BotFrameworkAdapter b = new BotFrameworkAdapter(new SimpleCredentialProvider(botConfig.BotID, botConfig.BotSecret));
	var message = Activity.CreateMessageActivity();
	message.Text = "login";
	message.From = new ChannelAccount(members[0].Id);
	message.Conversation = new ConversationAccount(id: conversationID, conversationType: "personal", tenantId: botConfig.TenantID);
	message.ChannelId = "msteams";

	TurnContext t = new TurnContext(b, (Activity)message);
	ClaimsIdentity id = new ClaimsIdentity();
	id.AddClaim(new Claim("aud", botConfig.BotID));
	t.TurnState.Add("BotIdentity", id);
	t.TurnState.Add("Microsoft.Bot.Builder.BotAdapter.OAuthScope", "https://api.botframework.com");
	t.TurnState.Add("Microsoft.Bot.Connector.IConnectorClient", m_client);
	string token = await myBot&lt;AuthDialog&gt;.GetTokenAsync(userID,t, default);
	return token;
}
public static async Task&lt;string&gt; GetGraphTokenForUser(UInt32 agentID)
{
	string conversationID = botState.GetConversationID(agentID);
	//m_client is a bot connector client
	var members = await m_client.Conversations.GetConversationMembersAsync(conversationID);

	BotFrameworkAdapter b = new BotFrameworkAdapter(new SimpleCredentialProvider(botConfig.BotID, botConfig.BotSecret));
	var message = Activity.CreateMessageActivity();
	message.Text = "login";
	message.From = new ChannelAccount(members[0].Id);
	message.Conversation = new ConversationAccount(id: conversationID, conversationType: "personal", tenantId: botConfig.TenantID);
	message.ChannelId = "msteams";

	TurnContext t = new TurnContext(b, (Activity)message);
	ClaimsIdentity id = new ClaimsIdentity();
	id.AddClaim(new Claim("aud", iceTeamsBotConfig.BotID));
	t.TurnState.Add("BotIdentity", id);
	t.TurnState.Add("Microsoft.Bot.Builder.BotAdapter.OAuthScope", "https://api.botframework.com");
	t.TurnState.Add("Microsoft.Bot.Connector.IConnectorClient", m_client);
	string token = await iceTeamsBot&lt;AuthDialog&gt;.GetTokenAsync(agentID,t, default);
	return token;
}

I had a reference stored in my state to the 1:1 conversation ID with a user.  Then I was able to create a TurnContext, and invoke the method I added earlier to get a token or trigger a sign in.  Then my API controller could do something like this:

[HttpPost("LoginTest")]
public async Task&lt;IActionResult&gt; LoginTest([FromBody] string userID)
{
	try
	{
		string token = await GetGraphTokenForUser(userID);
		if (token == string.Empty)
			return Ok("User must complete login");
		Microsoft.Graph.GraphServiceClient c = botState.GetGraphClient(token);
		var messages = await c.Me.MailFolders["inbox"].Messages.Request(new List&lt;Microsoft.Graph.QueryOption&gt; { new Microsoft.Graph.QueryOption("$search", <pre wp-pre-tag-9=""></pre>quot;\"subject:test\"") }).GetAsync();
		return Ok(<pre wp-pre-tag-9=""></pre>quot;Found {messages.Count} emails");
	}
	catch (Exception ex)
	{
		return StatusCode((int)HttpStatusCode.InternalServerError, ex.ToString());
	}
}

To search a mailbox.

In closing

Hopefully this post helps someone else deal with some of the “quirks” of working with the OAuth flow in the bot framework.  In general, the standard dialog component makes life much easier for developers, and with a few tweaks, it can be adapted to most bot scenarios.

Posted in Uncategorized | 1 Comment

Migrating from Microsoft.bot.teams preview to Microsoft.bot.builder 4.6

Let’s say, for example, that you were building a Teams bot over the summer, and wanted to use all of the latest bot framework 4 stuff.  There were a lot of beta/prerelease versions out there, that have since all been cleaned up into Microsoft.bot.builder 4.6.  The good news is that this should simplify everything, but the bad news is that there are a couple of (as yet undocumented) breaking changes in the update. 

Once you remove the Microsoft.Bot.Builder.Teams package and add Microsoft.Bot.Builder (4.6.3 as of today), you’ll probably get a couple of build errors.  Here’s what I found and how I fixed them:

  • In ConfigureServices, there was a call to services.AddBot<T>, and one of the required options was adding a new TeamsMiddleware object.  This doesn’t seem to be required anymore, so just take it out.
  • The ITeamsContext doesn’t seem to exist anymore, which you were able to get on a dialog turn with “var teamsContext = turnContext.TurnState.Get<ITeamsContext>();”.  I was mainly using this to get the channel ID of a message in a dialog turn, which now appears to be embedded in the channelData as JSON.  There doesn’t appear to be a method to serialize this, but you can just extract it from the json manually like this:

private static string GetChannelID(object channelData)
{
     try
     {
         //if the channelData contains a channel ID, return it, otherwise null
         if (!(channelData is JObject))
             return null;
         JObject j = (JObject)channelData;
         if (j.TryGetValue(“channel”, out var channel))
         {
             return channel[“id”].ToString();
         }
         return null;
     }
     catch (Exception ex)
     {
         _log.Error($”Exception parsing channel data {channelData} “, ex);       
     }
     return null;
}

  • The constructors for some responses have changed, so where before you’d have something like:
  • var resp = new TaskModuleContinueResponse(“continue”);

    you now have:

    var resp = new TaskModuleContinueResponse();
    resp.Type = “continue”;

  • The ToAttachment extension on adaptive cards seems to have been taken out, which was handy for dynamically defining cards for task modules.  Fortunately, the source is still on github, so it’s pretty easy to grab it and define your own copy of that method if you’re using it already:

public static partial class CardExtensions
{
     public static Attachment ToAttachment(this AdaptiveCards.AdaptiveCard card)
     {
         return new Attachment
         {
             Content = card,
             ContentType = AdaptiveCards.AdaptiveCard.ContentType,
         };
     }
}

That’s about all I found that was broken, and otherwise everything seemed to work in the bot after the update.  There might be other things in the SDK now that would be better practice, but I’ll have to dig into that a little more later.  For now, I can at least get all the prerelease stuff out of the project. 

It’s great to see Teams as a first class bot citizen now-looking forward to what’s next!

    Posted in Uncategorized | 1 Comment

    Beware onprem DLs-they could delete a cloud group (including Teams)

    I’ve run into this a couple of times, and fortunately now there’s a way to fix it.  This is a case of Azure AD sync being a little…aggressive with syncing onprem objects to the cloud.  Say you’d created a Team, which creates an O365 group, with the address team1@domain.com.  You have some team channels, notebooks, and everything is working as expected.  Then, because you have a hybrid mail setup, an exchange admin creates a distribution list onprem (because that’s the way they’ve always done things) called… team1@domain.com.  You would think that this would just cause a sync error the next time it goes to sync online, but nope-the onprem object wins, and the Team, Group, and all associated content is deleted in favour of the “dumb” DL. 

    The first time this happened, there was no way to recover.  Any messages that had been sent to the modern group were lost, and we had to start from scratch.  The second time this happened was last week, and fortunately there’s now a way to recover a deleted group.  In this case, I just had to delete the onprem DL, restore the cloud group, and all was right with the world again.  You have 30 days until the “soft delete” expires, so as long as you catch it reasonably quickly, things will be recoverable. 

    Posted in Uncategorized | Leave a comment

    Moving from SFB to Teams-Contacts from SFB not importing, even when contact store is set to SFB

    When I started moving users to TeamsOnly, one of the first pilot users said that their contacts didn’t import from SFB.  Some digging around turned up this blog post, that outlined how to roll back the Unified Contact Store (UCS) to SFB server to allow contacts to import.  The challenge here though, is that the user’s account still listed SFB server as the contact store location. 

    Figuring it couldn’t hurt, I ran Invoke-CsUcsRollback for the user ID, and it forced the import on the next sign in.  Given that UCS isn’t supported for TeamsOnly anyway, this has become part of the standard command set that I’ve run to move users from SFB to TeamsOnly. 

    Posted in Uncategorized | Leave a comment

    Moving from SFB online to Teams-fix outbound calling appearing for TeamsOnly users

    This was another gotcha as part of the move from SFB online to Teams, and it only happened once (so far), but it’s another reason why moving users via Islands might be the way to go.  This was the scenario: a user was in SfbWithTeamsCollab, and moved to TeamsOnly.  After a couple of days in this scenario (just to make sure that it wasn’t timing-related), they could chat, and they could receive calls, but not make any calls.  Again, we tried the usual signing in via an incognito browser, cache clear, sign out and back in, reboot, and the other standard troubleshooting steps, but despite being enabled for everything they should be enabled for, they couldn’t make outbound PSTN calls.

    The end result was really the server-side equivalent of rebooting, which was to run:

    • Set-CsUser $id –EnterpriseVoiceEnabled $false
    • wait 10 minutes…
    • Set-CsUser $id –EnterpriseVoiceEnabled $true

    Which magically fixed things.  Having to wait for replication (and not being able to check replication status like in SFB) takes some patience, but eventually calling started working as expected. 

    Posted in Uncategorized | Leave a comment

    Moving from SFB to Teams-Why your guest users can’t chat, and how to fix it

    This is a reasonably specific case, but I thought it was kind of interesting.  When we first started piloting Teams we were in Islands, just like everyone else.  At that point people set up Teams, some of which had guest users, and everything worked just fine.  Then, as part of the migration, I switched the Org-Wide default to SfbWithTeamsCollab, and then started moving users over to TeamsOnly.  One of the consequences of this is that none of the guest users could chat with our internal users anymore, even those that were converted to TeamsOnly.

    As it turns out, the Org-Wide upgrade mode dictates whether guest users can chat inside a guest tenant.  Sure, there’s a setting in the admin center (Guest Access, Messaging, Chat), but if the tenant default is SfbWithTeamsCollab, it doesn’t have any effect. 

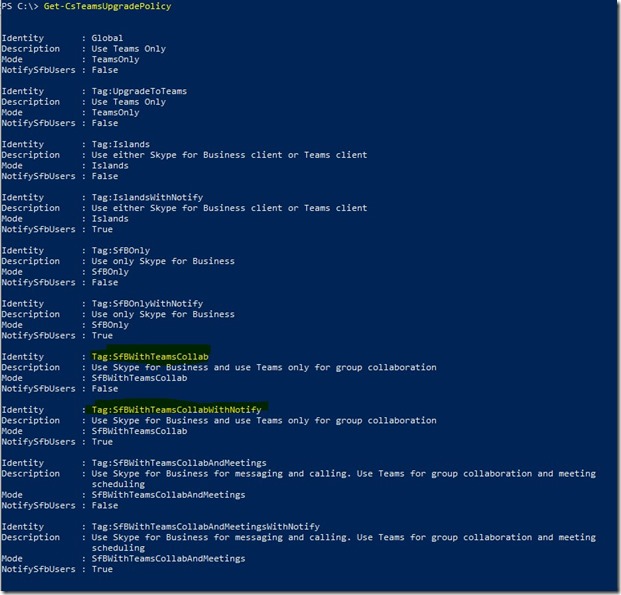
    To get out of this situation, I needed to change the default, but without changing the state of any of the users that hadn’t been migrated yet.  Of course, you can’t just run Grant-CsTeamsUpgradePolicy with SfbWithTeamsCollab, since Teams will stop you from doing something redundant.  The way around this though, is to note that there are actually two policies:

    teamsPolicies

    Note that one has the notification flag, and one doesn’t, so I could just iterate through the users with a $null policy assigned, and manually grant SfbWithTeamsCollabWithNotify to them.  Once that was done, I changed the global default, accepted the scary warning that we’d now be TeamsOnly, and fixed guest access chat.

    Again, I have no idea whether this is going to be a problem forever, and it smells like a bug to me, but at least in September 2019, this is still the way things behave.  Fortunately, there’s a way around it, and it also has the benefit of letting you move users to Teams by just removing a per-user policy instead of assigning one.  Might have been nice to know this BEFORE starting to move users, but that’s why I’m publishing this.  If it helps someone avoid the same issue (or at least fix it)-mission accomplished!

    Posted in Uncategorized | Leave a comment

    Moving from SFB to Teams-If you’re in SFB* consider visiting the Island on the way…

    Given the imminent demise of SFB online, I figured it was time to start moving more users over to TeamsOnly.  As with most O365 orgs, we’d been in Islands for a while, but to start moving anyone to Teams, you’re going to want to choose an interop mode than relegates chat/calling to one client, otherwise TeamsOnly users will only be able to chat with other users on Teams, which is less than transparent.  For us, this meant changing the org-wide default to SFBWithTeamsCollab, and then granting TeamsOnly to users as they got migrated.  This seemed like a reasonably straightforward approach, and a few days after having changed the default, I moved a batch of users to TeamsOnly one evening, thinking that the next morning things would have moved correctly…

    As it turns out, 2/3 of the pilot group were still unable to chat or make calls in Teams, even after sign outs, reboots, cache clears, and incognito chrome sessions.  What’s worse, when they signed out of SFB, they were informed that they’d been upgraded to Teams, so effectively they were unreachable in either platform.  The solution, in this case, was to move the users BACK to islands, wait a few hours, and then move them back to TeamsOnly once the provisioning had kicked in to enable calling and chat again (I assigned a direct routing voice policy while in Islands too, which isn’t technically supported, but works nonetheless).  This seemed to solve the problem.

    So, based on this lesson, my new move technique for getting a user on Teams is:

    • Grant-CsTeamsUpgradePolicy $id -PolicyName Islands
    • Grant-CsOnlineVoiceRoutingPolicy $id -PolicyName Unrestricted
    • wait 24h
    • Grant-CsTeamsUpgradePolicy $id -PolicyName UpgradeToTeams
    • Invoke-CsUcsRollback $id

    By putting the user in Islands for 24h, it makes sure that the chat/calling are enabled correctly before changing how things are routed.  I’ve done this for a couple of other batches over a weekend (Islands Friday night, TeamsOnly Saturday night), and it’s gone much smoother than SfbWithTeamsCollab straight to TeamsOnly.  This might not be a requirement forever, but as of now (September 2019), it certainly helps.

    Posted in Uncategorized | Leave a comment

    Issues moving users back to on-prem telephony from an expired calling plan license

    This might be a unique situation, but I wanted to document it somewhere in case anyone else runs into the same issues.  Here’s the scenario: I have an O365 tenant set up with hybrid voice (SFB 2015 Enterprise on prem), with users homed online.  User line URIs are set on prem, replicated to the cloud, and PSTN calls in/out go via the onprem server.  This is a textbook hybrid deployment, and everything was working just fine.

    A few months ago, calling plans came to Canada, and we got involved in the preview, so I assigned licenses to a couple of accounts to test it out.  The online phone numbers worked just fine, and I promptly forgot all about them until the licenses expired, at which point a user with an online phone number that tried to make a call got connected to an announcement service saying that “you are not configured for this calling feature”.  Obviously, at this point I wanted to revert those users back to the onprem connectivity.

    Step 1-try removing the phone number from the user in the portal…doesn’t work.  It just informs you that “phone numbers could not be unassigned from 1 of 1 users”.  OK, then I thought maybe I had to remove the calling plan license from the user first.  Tried that, but then still couldn’t unassign the phone number.  I also tried going in and removing the phone number from the phone numbers interface, which gave me the same error.  At this point I decided that powershell might be the way to force the issue, and was able to run Remove-CsOnlineTelephoneNumber to delete the number from the account. 

    At this point however, I had a user that had an OnPremLineUri assigned, but no LineUri.  EnterpriseVoiceEnabled was still set to $true (get-csonlineuser), but the user’s PSTN connectivity still showed as Online in the portal, with no apparent way to reset it.  I tried a few different things at this point, with no success:

    • Run a new AD sync: no effect
    • Disable/re-enable EV, thinking it might force it to pick up the setting again: no effect
    • Move the user back on prem, and then online: This actually worked, in that while the user was homed onprem, they could make and receive calls, but when I moved them back online, the original problem returned. 

    At this point, I gave up and opened a support ticket, and the best I managed to get from the Engineer there was “wait 24 hours”…

    The next day, I checked the account, and lo and behold, the user’s line URI had reverted.  I had to re-enable EV for the user, but once I did (and waited for the provisioning to take effect), everything was back to normal. 

    So, lessons learned:

    • It’s probably a good idea not to let calling plan licenses expire.
    • If you do have to move a user from calling plan back to onprem PSTN, it might take a while. 
    • Once you do move them, you might have to re-enable EV across the board.
    • This might get messy at scale, with users unable to make/receive calls for a period of time.

    If anyone has figured out a way to get this to take effect more immediately, I’d love to know about it, but in the meantime, if you have the same issue, I suppose the only solution is to just wait it out.

    Posted in Uncategorized | Leave a comment